|
My APB
arrived to me in good working condition
(although the marquee was not working
properly) and the artwork overall was pretty
decent. Of course the original colors
in all the artwork had faded/morphed away
from what they originally were (as is the
case with all mid-late era 80's Atari
titles) but through the help of collector
Steve Piozet, Rich Lint of ThisOldGame, and
Jeff Rothe, the complete artwork package
will soon be available.
|
EDIT 11/11/09:
Rich at
ThisOldGame has recently completed a run of
APB side art! It's now available for
purchase at the ThisOldGame website:

APB Side Art |
|
I started out restoring
the seat. The
stand was a bit rusty (I forgot to take a
before picture of it) so I got that powder
coated. Home Depot sells those small
feet that you see pictured, and you can see
the seat arrived to me without any rubber
matting and the chrome t-molding was
scratched up as well, so I applied new
rubber and molding to it. The artwork
is in great shape, but as soon as Rich at
ThisOldGame prints the seat art, I'll be
replacing it with either the correct color
schemed art that shipped with the game which
is actually blue and white* or the flyer
artwork (I'm kind of leaning towards the
flyer artwork for the seat to be
honest).
*The blue and white original
colors changed (i.e. 'yellowed') to green
and yellow over time, see this thread for
details on that:
APB Seat Decal / Sticker. |
Here's
a bigger picture of just the seat from the front:
|
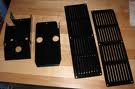
The coin doors and door parts on this game
were not rusted or scratched up which was a
pleasant surprise, so I left those be, but I
did get the 2 main pedal assembly pieces and
the monitor vents powdercoated.
|
|
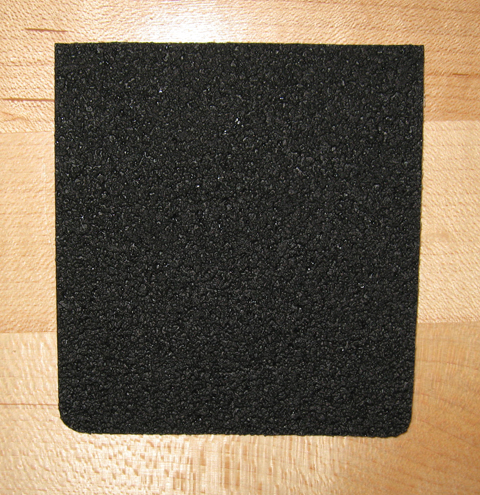
The 4 bushings for the pedal all
needed to be cleaned and lubed (use white lithium
grease for these) and the potentiometer needed to be
replaced as well (note: you can test your
potentiometer in the test mode). Also, I needed to
replace the pedal pad. Home Depot sells a 3M
anti-skid tape which I was going to use, but I found
it to be pretty abrasive, so I looked around and
ended up finding another type of self-adhesive
anti-skid tape at a local hardware store that has
more of a rubberized composite and nicer feel, which
I really liked over the abrasive stuff. I bought a
few feet of it so if anyone out there goes to
restore their pedal and needs some, just message me
and I'll send you a piece. |
|
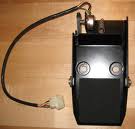
Here's a picture of the pedal assembly after
everything was completed:
|
|
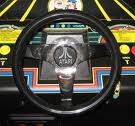
I took the whole steering assembly
apart, and saw that the large Thompson bearing had a
piece chipped off of it and the housing was a bit
worn as well, so I replaced the housing and both the
large and small Thompson bearings with NOS parts.
The steering wheel cap that came with it had all the
silver worn off the Atari logo, so I replaced that
with a NOS piece too: |
|
My APB came with a WG4915 monitor that had
typical APB burn in it, so I replaced that
with a Neotec NT-500DXi9 which can accept
CGA, EGA or VGA inputs. It really has an
amazing picture, and it's also a bit heavier
than your standard 19". |
|
The DXi9 has a pretty
extensive menu system and one of the
settings is color temperature, which I
changed from 6300K to 9300K as there was
just too much color initially. There's also
a 5600K setting too but that looked pretty
much the same as the 6300K. I also toned
down the contrast a bit, as well as the
brightness. It took a few minutes or so
playing around before I got it dialed in
perfect. I mounted the interface pcb inside
the control panel so that made it easy to
adjust everything. Also, note that in the
APB test mode there's a screen to adjust
overall intensity which you need to use to
correctly adjust the brightness. |
|
Here's a a picture after replacing the bezel
and the glass: |
|
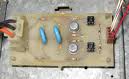
Also, the marquee lights
were not flashing in attract mode like they
were supposed to. They just both remained
on. And in-game, they just remained on as
well, which is also not right: during the
game they should only be on when you press
"SIREN". So I tested some parts on the triac
pcb and found both N5756s to be bad. I
ordered some of those, as well as some
MOC3011s to have on hand. For those that
have an APB with an improperly functioning
marquee, odds are one or more of the
components on the triac pcb have gone bad. |
|
Here's a link to a short video that I made
showing how the
marquee is supposed to react during both
attract mode, and during game play as well:

Atari_APB_Marquee
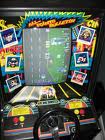
This is a picture taken of the interior
after everything was reassembled and hooked
up:
|
|
I also replaced the chrome
t-molding on the cabinet as well as the fan,
and the 4 FIRE and SIREN leaf switch
buttons. Here are some full length
pictures of the left and right sides: |
|
Here is a picutre of it after being moved
into the arcade: |
|
Still
to do is to apply new side art to the
cabinet and also to the seat,
and replace the control panel and
marquee overlays. |

HOME

|